通过 GitLab 在线平台,手搓 Clash Meta 节点配置文件并生成订阅地址

  • 剪贴板按钮,复制文件的全部内容
  • 点击左侧的  号,选择 “New Project / Repository”。然后选择“Create blank project”
  • 输入项目名称,项目类型选择“Private”,点击“Create project”按钮进行创建库
  • 点击“Edit”下的“Web IDE”按钮,进入 GitLab 的编辑器
  • 点击文件视图上方的新建按钮,然后输入文件名称(文件名后面记得加 .yaml 后缀!!)
  • 将第一步的内容粘贴到新建的文件中
  • 在第一区域中,可以修改有关 DNS 配置(如不懂修改请保持默认即可)
  • 在第二区域中,可以修改节点配置(修改的地方已标注注释,根据注释修改即可)
  • 在第三区域中,可以修改分流组设置,按需求自行增减,确保出现的节点名称在代理协议中可查找得到
  • 在第四区域中,可以修改代理规则设置。如各位会玩的朋友来说,可以在此适当增加代理规则。一般情况下,默认的规则就已经够用了
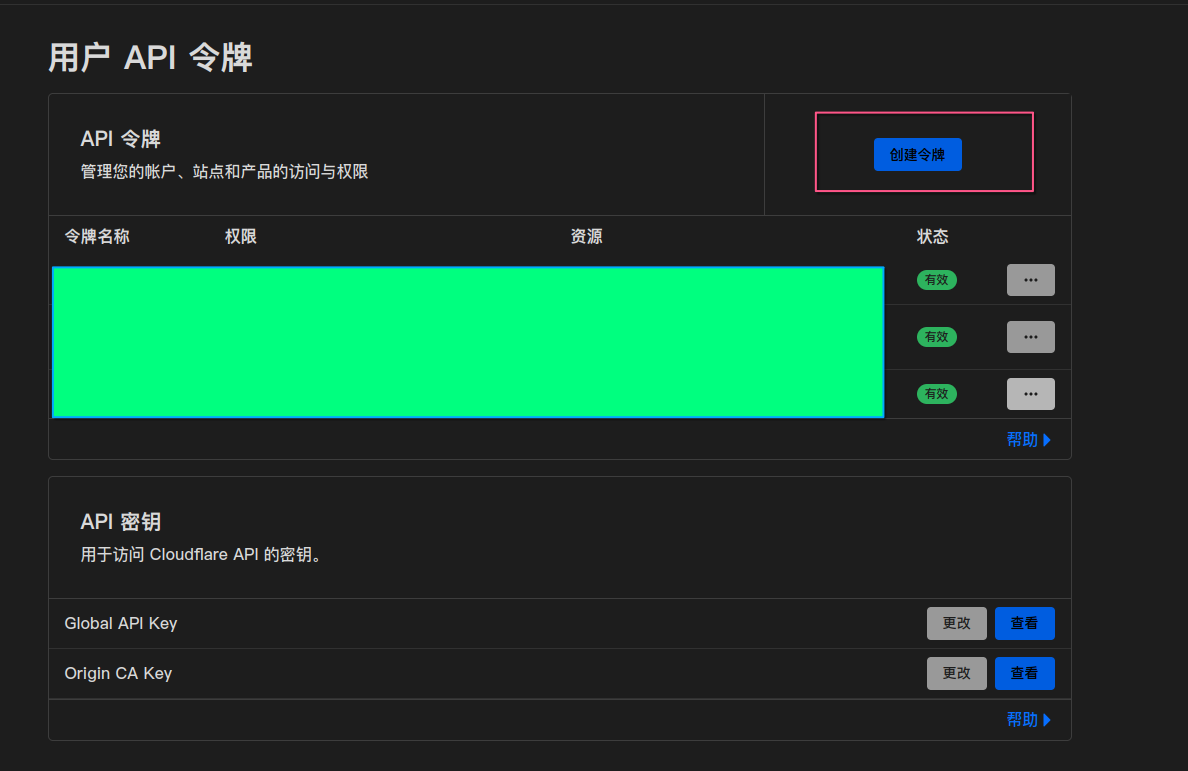
  • 转到项目设置中的“Access Tokens”页面,新增一个 Token。名称可以随意填写,其的有效期可以点击“×”号禁用。组选择“Owner”,访问权限勾选 api,然后点击“Create project access token”按钮
  • 生成完访问密钥之后,点击剪贴板按钮将密钥复制,保存备用
  • 通过修改以下链接的仓库名称和 Token,获取自己的节点配置文件订阅链接
  • plaintext
  • 可以使用基于 Clash Meta 内核的客户端,测试导入节点。如能正常导入则说明节点配置没有任何问题

不刷固件更新passwall

说在最前面,不是特别建议直接更新ipk的方式更新,因为依赖不一样,版本差距较大会带来不可预知的BUG。

1、查看自己的软 路由CPU架构

进入TTYD终端或通过shell进入软 路由

输入 uname -m

然后再输入 opkg print-architecture

最简单的
cat /etc/os-release |grep ARCH

例如我的r4s,可以看到 arch aarch64_generic 那我去找对应的插件就行。

2、查找插件

推荐网站

https://op.dllkids.xyz/
https://op.supes.top/packages/

packages目录里面选aarch64_generic

然后搜索 passwall

之后,下载

3、升级

 路由 软件包—过滤器,搜passwall,然后选择移除。

文件传输—选择文件—上传—结束。

4、注意

如果passwall的版本垮的多,建议恢复默认后重新设置。

http://软 路由IP/cgi-bin/luci/admin/services/passwall/reset_config

第二种方法

下载作者原版ipk以及相关依赖
https://github.com/xiaorouji/ openwrt-passwall/releases

一个passwall、一个语言包,一个依赖包(根据之前查询到的cpu类型下载)
1.进入软 路由 ,在/tmp 里面新建一个文件,然后把 软件全部上传进去
2.执行安装代码
第一次用这种方式升级,强烈建议用第一个代码,如果第一个代码报错,试试第二个

opkg install *.ipk --force-reinstall
opkg install *.ipk --force-depends

此后升级,如果发现依赖不用替换,之是升级passwall的话,用下面这个代码

opkg install *.ipk

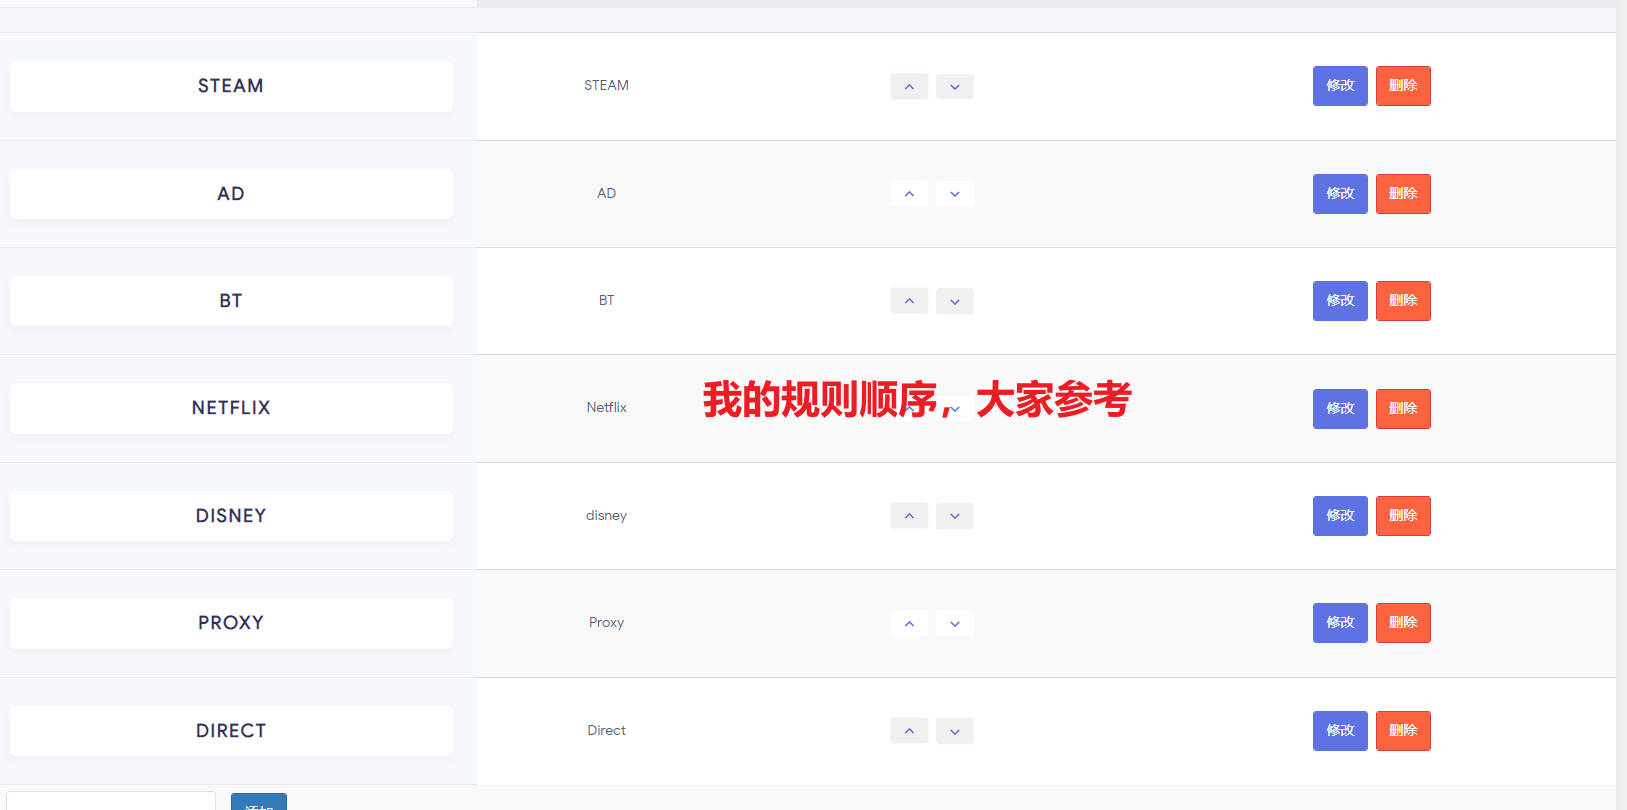
还有人问我,我的passwall规则设置如下一定要注意先后关系,也就是顺序不能错

STEAM
域名

api.steampowered.com
regexp:\.cm.steampowered.com$
regexp:\.steamserver.net$

IP

103.10.124.0/24
103.10.125.0/24
103.28.54.0/24
146.66.152.0/24
146.66.155.0/24
153.254.86.0/24
155.133.224.0/23
155.133.226.0/24
155.133.227.0/24
155.133.230.0/24
155.133.232.0/24
155.133.233.0/24
155.133.234.0/24
155.133.236.0/23
155.133.238.0/24
155.133.239.0/24
155.133.240.0/23
155.133.245.0/24
155.133.246.0/24
155.133.248.0/24
155.133.249.0/24
155.133.250.0/24
155.133.251.0/24
155.133.252.0/24
155.133.253.0/24
155.133.254.0/24
155.133.255.0/24
162.254.192.0/24
162.254.193.0/24
162.254.194.0/23
162.254.195.0/24
162.254.196.0/24
162.254.197.0/24
162.254.198.0/24
162.254.199.0/24
185.25.182.0/24
185.25.183.0/24
190.217.33.0/24
192.69.96.0/22
205.185.194.0/24
205.196.6.0/24
208.64.200.0/24
208.64.201.0/24
208.64.202.0/24
208.64.203.0/24
208.78.164.0/22

AD
域名

geosite:category-ads-all

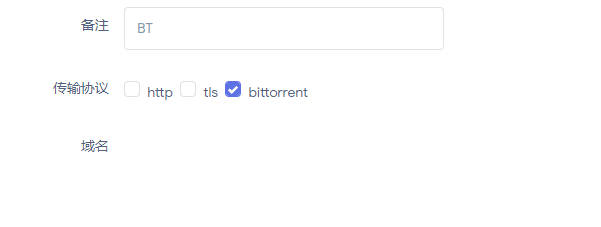
BT

Netflix
域名

geosite:netflix

disney
域名

geosite:disney

Proxy
域名

geosite:geolocation-!cn

ip

149.154.160.0/20
91.108.4.0/22
91.108.56.0/24
109.239.140.0/24
67.198.55.0/24
8.8.4.4
8.8.8.8
208.67.222.222
208.67.220.220
1.1.1.1
1.1.1.2
1.0.0.1
9.9.9.9
149.112.112.112
2001:67c:4e8::/48
2001:b28:f23c::/48
2001:b28:f23d::/48
2001:b28:f23f::/48
2001:b28:f242::/48
2001:4860:4860::8888
2001:4860:4860::8844
2606:4700:4700::1111
2606:4700:4700::1001

Direct
域名

geosite:category-games@cn
geosite:cn

IP

223.5.5.5/32
119.29.29.29/32
180.76.76.76/32
114.114.114.114/32
geoip:cn
geoip:private

x-ui搭建vless+vision+tls

安装X-UI
bash <(curl -Ls https://raw.githubusercontent.com/FranzKafkaYu/x-ui/956bf85bbac978d56c0e319c5fac2d6db7df9564/install.sh) 0.3.4.4

搭建vision节点申请证书

#安装证书工具:
curl https://get.acme.sh | sh; apt install socat -y || yum install socat -y; ~/.acme.sh/acme.sh --set-default-ca --server letsencrypt

#三种方式任选其中一种,申请失败则更换方式
#申请证书方式1: 
~/.acme.sh/acme.sh  --issue -d 你的域名 --standalone -k ec-256 --force --insecure
#申请证书方式2: 
~/.acme.sh/acme.sh --register-account -m "${RANDOM}@chacuo.net" --server buypass --force --insecure && ~/.acme.sh/acme.sh  --issue -d 你的域名 --standalone -k ec-256 --force --insecure --server buypass
#申请证书方式3: 
~/.acme.sh/acme.sh --register-account -m "${RANDOM}@chacuo.net" --server zerossl --force --insecure && ~/.acme.sh/acme.sh  --issue -d 你的域名 --standalone -k ec-256 --force --insecure --server zerossl

#安装证书:
~/.acme.sh/acme.sh --install-cert -d 你的域名 --ecc --key-file /etc/x-ui/server.key --fullchain-file /etc/x-ui/server.crt

Reality寻找适合的目标网站
查询ASN:https://tools.ipip.net/as.php

寻找目标:https://fofa.info

asn==”25820″ && country==”US” && port==”443″ && cert!=”Let’s Encrypt” && cert.issuer!=”ZeroSSL” && status_code=”200″

检测端口是否被封
https://tcp.ping.pe/

x-ui面板实现多ip分流出站

  • xui是最简单的面板,估计没有之一
    通过xui实现多ip分流也很简单
    创建好入站后直接修改面板设置里的xray配置模板就可以了
{
  "api": {
    "services": [
      "HandlerService",
      "LoggerService",
      "StatsService"
    ],
    "tag": "api"
  },
  "inbounds": [
    {
      "listen": "127.0.0.1",
      "port": 62789,
      "protocol": "dokodemo-door",
      "settings": {
        "address": "127.0.0.1"
      },
      "tag": "api"
    }
  ],

  "outbounds": [
   {
      "tag": "ip1",
      "sendThrough": "1.1.1.1",
      "protocol": "freedom",
      "settings": {}
    },
    {
      "tag": "ip2",
      "sendThrough": "1.1.1.2",
      "protocol": "freedom",
      "settings": {}
    },
    {
      "protocol": "freedom",
      "settings": {}
    },
    {
      "protocol": "blackhole",
      "settings": {},
      "tag": "blocked"
    }
  ],
  "policy": {
    "system": {
      "statsInboundDownlink": true,
      "statsInboundUplink": true
    }
  },

  "routing": {
    "rules": [
   {
        "inboundTag": [
          "inbound-xxxxx","inbound-xxxxx"
        ],
        "outboundTag": "ip1",
        "type": "field"
      },
      {
        "inboundTag": [
          "inbound-xxxxx","inbound-xxxxx"
        ],
        "outboundTag": "ip2",
        "type": "field"
      },
      {
        "inboundTag": [
          "api"
        ],
        "outboundTag": "api",
        "type": "field"
      },
      {
        "ip": [
          "geoip:private"
        ],
        "outboundTag": "blocked",
        "type": "field"
      },
      {
        "outboundTag": "blocked",
        "protocol": [
          "bittorrent"
        ],
        "type": "field"
      }
    ]
  },
  "stats": {}
}

xray的通信原理是inbound-routing-outbound,也就是入站-路由规则-出站
入站节点内容存放在数据库内,不在模板中,数据库与模板共同组合成config.json
要实现多ip分流,主要是通过修改路由规则将入站列表中的节点与不同的出站ip进行连接
所以编辑routing和outbound即可,创建好节点后inbound内容无需修改

outbound(出站)解析

"outbounds": [
    {
      "tag": "ip1",
      "sendThrough": "1.1.1.1",
      "protocol": "freedom",
      "settings": {}
    },
    {
      "tag": "ip2",
      "sendThrough": "1.1.1.2",
      "protocol": "freedom",
      "settings": {}
    },
    ...........
]

“tag”:定义此出站配置的标识,内容随意,自己分得清就行
“sendThrough”:定义出站ip
有多少个ip就添加多少个{….},注意{….}间用英文逗号隔开

routing(路由规则)解析

"routing": {
    "rules": [
      {
        "inboundTag": [
          "inbound-xxxxx","inbound-xxxxx"
        ],
        "outboundTag": "ip1",
        "type": "field"
      },
      {
        "inboundTag": [
          "inbound-xxxxx","inbound-xxxxx"
        ],
        "outboundTag": "ip2",
        "type": "field"
      },
      ................
]
  • “inboundTag”:入站配置的标识,每个入站列表中的节点都有相对应的inboundTag

xui对inboundTag的命名规则是inbound-节点端口号,比方说一个节点的端口是88888,那么这个节点的inboundTag就是inbound-88888
◆ “outboundTag”:对应出站配置的标识
这个路由规则的意思是说,将inboundtag-xxxxx所在的inbound节点与outbound ip连接。这样就可以实现ip1通过ip1出站,ip2通过ip2出站,或者ip1、ip2通过ip1出站,ip3、ip4通过ip2出站,可以随意组合
不想了解那么多也可以,直接将routing和outbound里的xx修改好,参照上面模板放在相应的位置,重启服务就好了

XrayR后端的TLS交给Nginx处理的配置

在之前我记录了一下xrayr后端节点的常用配置方法,在这种方法下,tls是直接由xrayr处理的,这样一来会有一些问题。

首先为了避免机器被墙,现在无一例外肯定是使用vmess+websocket+tls或者vless+xtls(xrayr是支持的)

但无论你使用上面提到的这两种方法的哪一种,都是非常依赖443端口的,如果让xrayr直接监听443的话,机器就不能再做其他事情了。比如用nginx或者caddy建站就不能https了。

用其他端口配置吧,又显得有点不伦不类。所以最好的办法是让nginx来处理tls,这样443端口就可以腾出来给nginx用了。

vless+xtls其实是目前更推荐的配置方法,但是目前v2board面板的订阅还不支持,所以下面我就用vmess+websocket+tls来演示一下配置。

首先在节点上安装需要用到的包:

apt -y update
apt -y install nginx python-certbot-nginx supervisor

启动服务并设置开机自启:

systemctl enable --now nginx supervisor

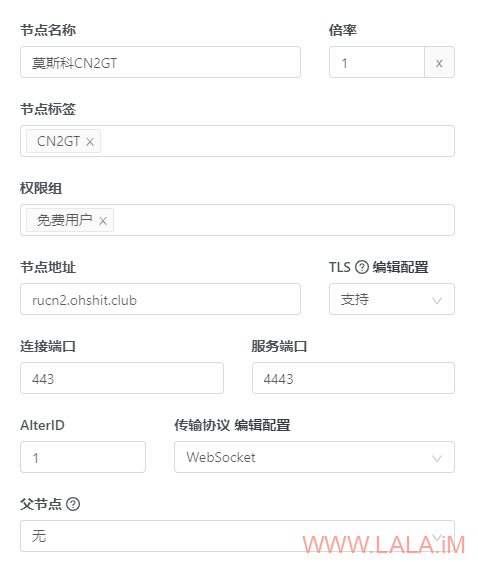
接着在v2board面板内添加一个websocket节点:

注意这里的连接端口和服务端口,连接端口配置为443,服务端口配置为4443。

连接端口就相当于是用户通过订阅连接配置在客户端上的端口,而服务端口是xrayr后端实际监听的端口。

另外别忘了配置path:

现在新建一个nginx站点配置文件:

nano /etc/nginx/conf.d/xrayr.conf

写入如下配置:

server {
    listen       80;
    server_name  rucn2.ohshit.club;

    location /sometimesnaive {
        proxy_pass                       http://127.0.0.1:4443;
        proxy_redirect                   off;
        proxy_http_version               1.1;
        proxy_set_header Upgrade         $http_upgrade;
        proxy_set_header Connection      "upgrade";
        proxy_set_header Host            $http_host;
        proxy_set_header X-Real-IP       $remote_addr;
        proxy_set_header X-Forwarded-For $proxy_add_x_forwarded_for;
    }
}

剩下给nginx配置ssl证书的这些步骤全部交给certbot自动帮我们处理即可:

certbot --nginx

现在安装xrayr:

mkdir /opt/xrayr && cd /opt/xrayr
wget https://github.com/XrayR-project/XrayR/releases/download/v0.5.0/XrayR-linux-64.zip

编辑xrayr配置文件:

nano config.yml

改为如下配置,重要部分写了注释:

Log:
  Level: debug
  AccessPath: ./access.log
  ErrorPath: ./error.log
DnsConfigPath: ./dns.json
Nodes:
  -
    PanelType: "V2board"
    ApiConfig:
      ApiHost: "https://v2board.ohshit.club/"
      ApiKey: "imlalaimlalaimlala"
      NodeID: 4 // 对应v2board面板内的节点id
      NodeType: V2ray
      Timeout: 30
      EnableVless: false
      EnableXTLS: false
    ControllerConfig:
      ListenIP: 127.0.0.1 // 仅监听在本地
      UpdatePeriodic: 60
      EnableDNS: false
      CertConfig:
        CertMode: none // 关闭证书申请
        CertDomain: "rucn2.ohshit.club" 
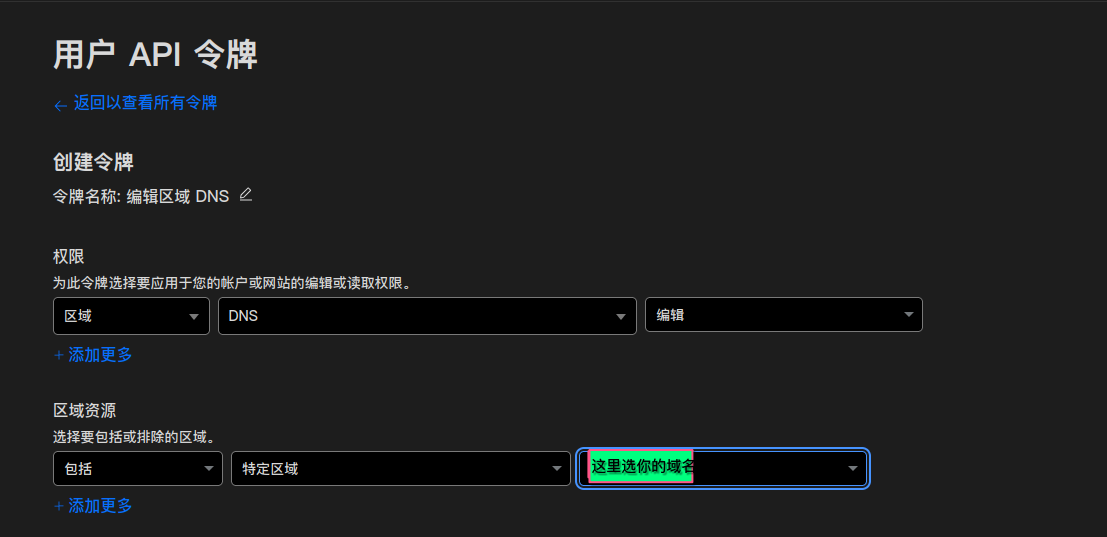
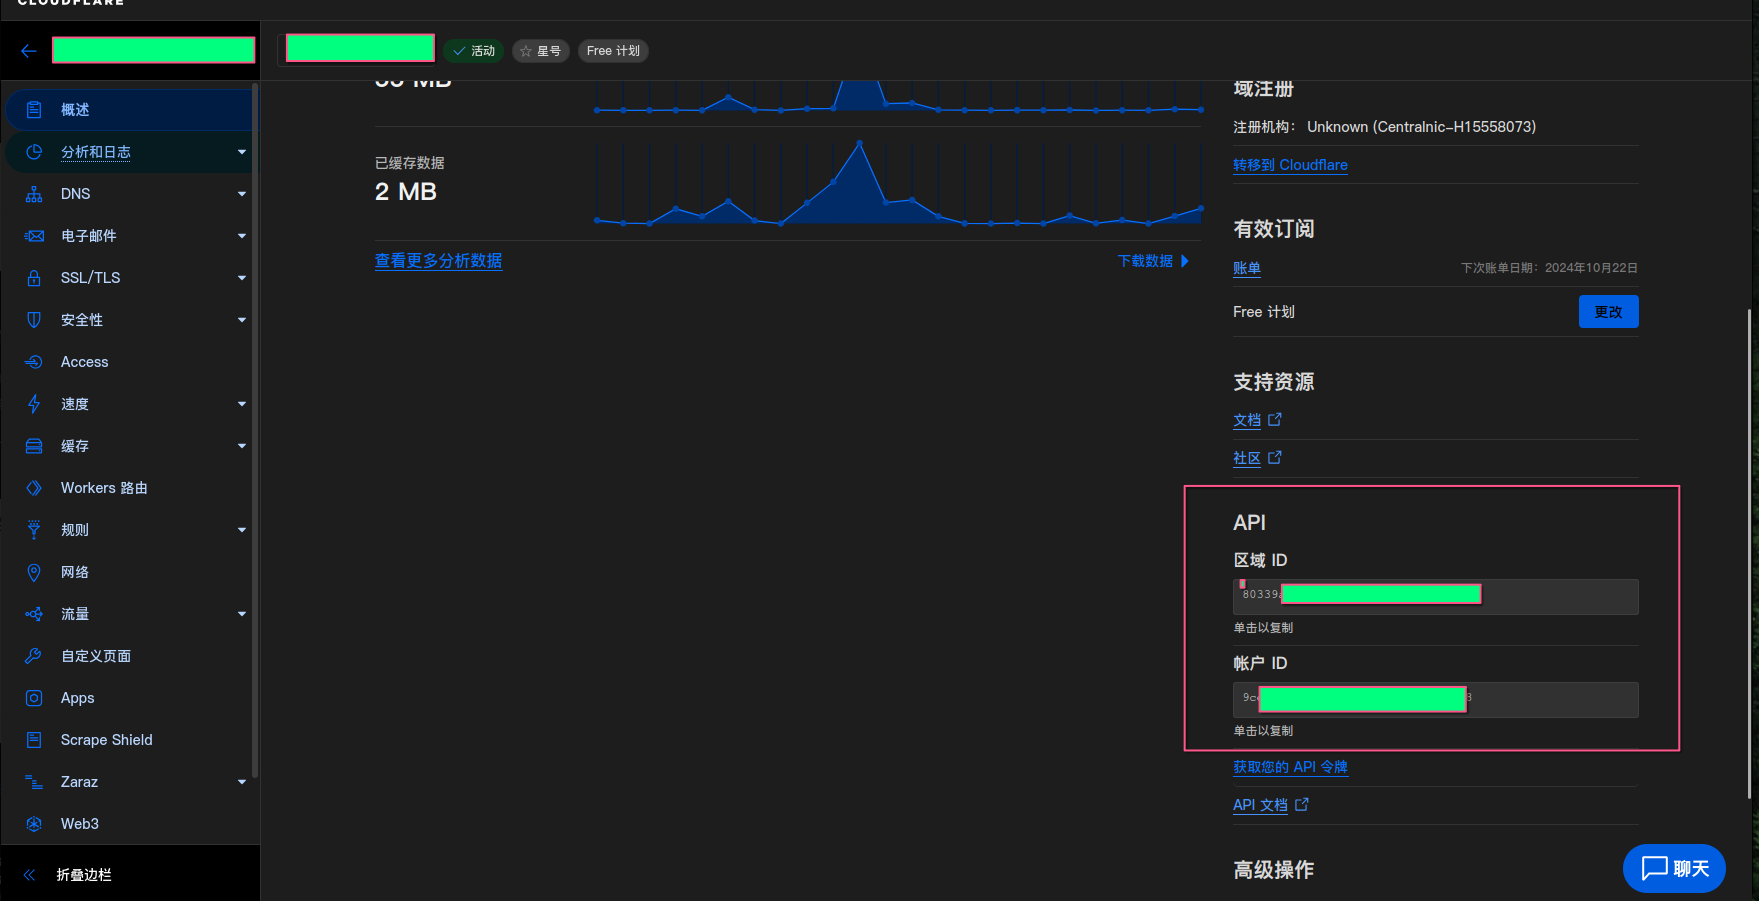
        Provider: cloudflare 
        Email: example@lala.im
        DNSEnv: 
          CF_DNS_API_TOKEN: cwPZEBAvIXUcxCdy4v2ib5j8uK-KwnRMDuNPxE-n

新建supervisor配置文件用于守护xrayr:

nano /etc/supervisor/conf.d/xrayr.conf

写入如下配置:

[program:xrayr]
directory=/opt/xrayr
command=/opt/xrayr/XrayR -config config.yml
autostart=true
autorestart=true

启动xrayr:

supervisorctl update

至此配置就全部完成了。对接有任何问题,查看相应的日志文件有助于排错:

/opt/xrayr/access.log
/opt/xrayr/error.log

下面是我自己的配置:

server {
    server_name  s**.jjm6.com;

    location /allgood {
        proxy_pass                       http://127.0.0.1:14431;
        proxy_redirect                   off;
        proxy_http_version               1.1;
        proxy_set_header Upgrade         $http_upgrade;
        proxy_set_header Connection      "upgrade";
        proxy_set_header Host            $http_host;
        proxy_set_header X-Real-IP       $remote_addr;
        proxy_set_header X-Forwarded-For $proxy_add_x_forwarded_for;
    }

    listen 443 ssl; # managed by Certbot
    ssl_certificate /etc/letsencrypt/live/sgp.jjm6.com/fullchain.pem; # managed by Certbot
    ssl_certificate_key /etc/letsencrypt/live/sgp.jjm6.com/privkey.pem; # managed by Certbot
    include /etc/letsencrypt/options-ssl-nginx.conf; # managed by Certbot
    ssl_dhparam /etc/letsencrypt/ssl-dhparams.pem; # managed by Certbot

}server {
    if ($host = sgp.jjm6.com) {
        return 301 https://$host$request_uri;
    } # managed by Certbot


    listen       80;
    server_name  sgp.jjm6.com;
    return 404; # managed by Certbot


}

通过x-ui面板搭建实现vmess+ws+tls+web伪装单端口多用户合租。

节点搭建

#更新软件源
apt update
#启用 BBR TCP 拥塞控制算法
echo "net.core.default_qdisc=fq" >> /etc/sysctl.conf
echo "net.ipv4.tcp_congestion_control=bbr" >> /etc/sysctl.conf
sysctl -p

#安装x-ui:
bash <(curl -Ls https://raw.githubusercontent.com/vaxilu/x-ui/master/install.sh)

#安装nginx
apt install nginx
#安装acme:
curl https://get.acme.sh | sh
#添加软链接:
ln -s  /root/.acme.sh/acme.sh /usr/local/bin/acme.sh
#切换CA机构: 
acme.sh --set-default-ca --server letsencrypt
#申请证书: 
acme.sh  --issue -d 你的域名 -k ec-256 --webroot  /var/www/html
#安装证书:
acme.sh --install-cert -d 你的域名 --ecc --key-file /etc/x-ui/server.key  --fullchain-file /etc/x-ui/server.crt --reloadcmd "systemctl force-reload nginx"

寻找适合的伪装站

http站点优先,个人网盘符合单节点大流量特征

示例关键字:intext:登录 Cloudreve

配置nginx

配置文件路径:/etc/nginx/nginx.conf

user www-data;
worker_processes auto;
pid /run/nginx.pid;
include /etc/nginx/modules-enabled/*.conf;

events {
    worker_connections 1024;
}

http {
    sendfile on;
    tcp_nopush on;
    tcp_nodelay on;
    keepalive_timeout 65;
    types_hash_max_size 2048;

    include /etc/nginx/mime.types;
    default_type application/octet-stream;
    gzip on;

    server {
        listen 443 ssl;
        
        server_name nicename.co;  #你的域名
        ssl_certificate       /etc/x-ui/server.crt;  #证书位置
        ssl_certificate_key   /etc/x-ui/server.key; #私钥位置
        
        ssl_session_timeout 1d;
        ssl_session_cache shared:MozSSL:10m;
        ssl_session_tickets off;
        ssl_protocols    TLSv1.2 TLSv1.3;
        ssl_prefer_server_ciphers off;

        location / {
            proxy_pass https://bing.com; #伪装网址
            proxy_redirect off;
            proxy_ssl_server_name on;
            sub_filter_once off;
            sub_filter "bing.com" $server_name;
            proxy_set_header Host "bing.com";
            proxy_set_header Referer $http_referer;
            proxy_set_header X-Real-IP $remote_addr;
            proxy_set_header User-Agent $http_user_agent;
            proxy_set_header X-Forwarded-For $proxy_add_x_forwarded_for;
            proxy_set_header X-Forwarded-Proto https;
            proxy_set_header Accept-Encoding "";
            proxy_set_header Accept-Language "zh-CN";
        }


        location /ray {   #分流路径
            proxy_redirect off;
            proxy_pass http://127.0.0.1:10000; #Xray端口
            proxy_http_version 1.1;
            proxy_set_header Upgrade $http_upgrade;
            proxy_set_header Connection "upgrade";
            proxy_set_header Host $host;
            proxy_set_header X-Real-IP $remote_addr;
            proxy_set_header X-Forwarded-For $proxy_add_x_forwarded_for;
        }
        
        location /xui {   #xui路径
            proxy_redirect off;
            proxy_pass http://127.0.0.1:9999;  #xui监听端口
            proxy_http_version 1.1;
            proxy_set_header Host $host;
        }
    }

    server {
        listen 80;
        location /.well-known/ {
               root /var/www/html;
            }
        location / {
                rewrite ^(.*)$ https://$host$1 permanent;
            }
    }
}

每次修改nginx配置文件后必须使用 systemctl reload nginx 命令重新加载配置文件

多用户合租

通过修改nginx的配置文件实现ws path路径分流

location /ray {   #分流路径
    proxy_redirect off;
    proxy_pass http://127.0.0.1:10000; #Xray端口
    proxy_http_version 1.1;
    proxy_set_header Upgrade $http_upgrade;
    proxy_set_header Connection "upgrade";
    proxy_set_header Host $host;
    proxy_set_header X-Real-IP $remote_addr;
    proxy_set_header X-Forwarded-For $proxy_add_x_forwarded_for;
}

sing-box搭建vless-xtls-vision-reality

1、开启BBR加速

echo "net.core.default_qdisc=fq" >> /etc/sysctl.conf
echo "net.ipv4.tcp_congestion_control=bbr" >> /etc/sysctl.conf
sysctl -p

2、更新软件源及安装依赖

apt update && apt -y install wget git libc6-dev build-essential zlib1g-dev libssl-dev libevent-dev mingw-w64

3、安装go

wget -c https://go.dev/dl/go1.20.3.linux-amd64.tar.gz -O - | tar -xz -C /usr/local
echo 'export PATH=$PATH:/usr/local/go/bin' > /etc/profile
source /etc/profile

4、编译安装sing-box

go install -v -tags \
with_quic,\
with_grpc,\
with_dhcp,\
with_wireguard,\
with_shadowsocksr,\
with_ech,\
with_utls,\
with_reality_server,\
with_acme,\
with_clash_api,\
with_v2ray_api,\
with_gvisor,\
with_lwip \
github.com/sagernet/sing-box/cmd/sing-box@latest

5、复制编译好的sing-box到/usr/local/bin/目录

cp ~/go/bin/sing-box /usr/local/bin/
可能不成功。用下面命令:
wget https://github.com/SagerNet/sing-box/releases/download/v1.2.4/sing-box_1.2.4_linux_arm64.deb
dpkg -i sing-box_1.2.4_linux_amd64.deb
cp /usr/bin/sing-box /usr/local/bin/

6、为sing-box配置开机自启服务

cat > /etc/systemd/system/sing-box.service <<EOF


[Unit]
Description=sing-box service
Documentation=https://sing-box.sagernet.org
After=network.target nss-lookup.target
[Service]
CapabilityBoundingSet=CAP_NET_ADMIN CAP_NET_BIND_SERVICE
AmbientCapabilities=CAP_NET_ADMIN CAP_NET_BIND_SERVICE
ExecStart=/usr/local/bin/sing-box run -c /usr/local/etc/sing-box/config.json
Restart=on-failure
RestartSec=1800s
LimitNOFILE=infinity
[Install]
WantedBy=multi-user.target
EOF

7、创建sing-box文件夹创建sing-box配置文件

mkdir /usr/local/etc/sing-box && cd $_

touch config.json
{
  "log": {
    "level": "info",
    "timestamp": true
  },
  "dns": {
    "servers": [
      { 
        "tag": "local",
        "address": "https://1.1.1.1/dns-query",
        "detour": "direct"
      },
      {
        "tag": "block",
        "address": "rcode://success"
      }
    ],
    "rules": [
      { 
        "geosite": "cn",
        "server": "local"
      },
      {
        "geosite": "category-ads-all",
        "server": "block",
        "disable_cache": true
      }
    ]
  },
  "inbounds": [
    {
      "type": "vless",
      "tag": "vless-in",
      "listen": "::",
      "listen_port": 10010, //监听端口
      "users": [
        {
          "uuid": "bf000d23-0752-40b4-affe-68f7707a9661", //执行 sing-box generate uuid 生成
          "flow": "xtls-rprx-vision"
        }
      ],
      "tls": {
        "enabled": true,
        "server_name": "www.microsoft.com", //客户端可用的 serverName 列表,暂不支持 * 通配符
        "reality": {
          "enabled": true,
          "handshake": {
            "server": "www.microsoft.com", //目标网站,标准:国外网站,支持 TLSv1.3 与 H2
            "server_port": 443
          },
          "private_key": "UuMBgl7MXTPx9inmQp2UC7Jcnwc6XYbwDNebonM-FCc", // 执行 sing-box generate reality-keypair 生成
          "short_id": [ //客户端可用的 shortId 列表,可用于区分不同的客户端
            "0123456789abcdef" //执行 openssl rand -hex 8 生成或留空
          ]
        }
      }
    }
  ],
  "outbounds": [
    {
      "type": "direct",
      "tag": "direct"
    },
    {
      "type": "block",
      "tag": "block"
    }
  ],
  "route": {
    "rules": [
      {
        "geosite": "cn",
        "geoip": "cn",
        "outbound": "direct"
      },
      {
        "geosite": "category-ads-all",
        "outbound": "block"
      }
    ]
  }
}

8、测试配置文件是否有效

/usr/local/bin/sing-box run -c /usr/local/etc/sing-box/config.json

9、启动并设置sing-box为开机自启

systemctl enable --now sing-box

10、查看sing-box启动状态

systemctl status sing-box

#Clash配置示例

- name: vless
  type: vless
  server: x.x.x.x  #ip地址
  port: 10018  #端口
  uuid: 0cd4ef7d-2d2b-4cc0-abba-57b6322e7575  #UUID
  network: tcp
  udp: true
  tls: true
  flow: xtls-rprx-vision
  servername: www.microsoft.com  #服务端server_nam
  client-fingerprint: chrome
  reality-opts:
    public-key: ajBkMYVvF14hVLPw1cKwyMzHdAj7Rg6L6MyMg6btYV8  #服务端私钥对应的公钥
    short-id: 0123456789abcdef  #服务端short_id

目标网站是否符合标准检查网站
https://www.ssllabs.com/ssltest/

VLESS-XTLS-Vision-uTLS-REALITY,完美解决TLS指纹问题,安全稳定。

本配置TLS 由 REALITY 取代,可消除服务端 TLS 指纹特征,仍有前向保密性等,且证书链攻击无效,安全性超越常规 TLS。可指向别人的网站,无需自己买域名、配置 TLS 服务端,更方便,实现向中间人呈现指定 SNI 的全程真实 TLS,可解决 SNI 名单阻断问题。

#安装并将 Xray-core 升级到预发布版本

bash -c "$(curl -L https://github.com/XTLS/Xray-install/raw/main/install-release.sh)" @ install --version 1.8.0

#修改Xray配置信息(/usr/local/etc/xray/config.json)

{
  "log": {
    "loglevel": "warning"
  },
  "inbounds": [ 
    {
      "listen": "0.0.0.0",
      "port": 443, //监听端口
      "protocol": "vless",
      "settings": {
        "clients": [
          {
            "id": "uuid", //执行xray uuid生成
            "flow": "xtls-rprx-vision" //启用XTLS Vision
          }
        ],
        "decryption": "none"
      },
      "streamSettings": {
        "network": "tcp",
        "security": "reality",
        "realitySettings": {
          "show": false, // 选填,若为 true,输出调试信息
          "dest": "www.microsoft.com:443", //转发给自己设定的目标网站
          "xver": 0, //选填,默认关闭PROXY protocol发送
          "serverNames": [ // 必填,客户端可用的 serverName 列表,暂不支持 * 通配符
            "www.microsoft.com" //修改为目标网站的域名
          ],
          "privateKey": "ILdQxyQYfeI2ZE0NXTDtbUjsdYAYk6EmPVoDSJMsz2A", //修改为执行xray x25519后生成的私钥。
          "minClientVer": "1.8.0", //客户端 Xray 最低版本
          "shortIds": [ 
            "a3f9df45ae15d6c2" //若有此项,客户端shortId可为空。若不为空,可0到f(0123456789abcdef),长度为2的倍数,长度上限为16。执行:openssl rand -hex 8
          ]
        }
      },
      "sniffing": {
        "enabled": true,
        "destOverride": [
          "http",
          "tls"
        ]
      }
    }
  ],
  "routing": {
    "rules": [
      {
        "type": "field",
        "protocol": [
          "bittorrent"
        ],
        "outboundTag": "blocked",
        "ip": [
          "geoip:cn",
          "geoip:private"
        ] 
      }
    ]
  },
  "outbounds": [
    {
      "protocol": "freedom",
      "settings": {}
    },
    {
    "tag": "blocked",
      "protocol": "blackhole",
      "settings": {}
    }
  ]
}

#目标网站最低标准:国外网站,支持 TLSv1.3 与 H2,域名非跳转。目标网站是否符合标准检查网站:https://www.ssllabs.com/ssltest/

#win版本客户端下载地址:https://github.com/2dust/v2rayN/releases

#安卓客户端下载地址:https://github.com/2dust/v2rayNG/releases

#Xray-core下载地址:https://github.com/XTLS/Xray-core/releases

CLASH使用CFW的parsers功能自动插入负载均衡策略组实现多线程下载带宽叠加,完美配合CDN优选IP

CFW自动添加负载均衡

parsers:
  - reg: 'slbable$'
    yaml:
      append-proxy-groups:
        - name: ⚖️ 负载均衡-散列
          type: load-balance
          url: 'http://www.google.com/generate_204'
          interval: 300
          strategy: consistent-hashing
        - name: ⚖️ 负载均衡-轮询
          type: load-balance
          url: 'http://www.google.com/generate_204'
          interval: 300
          strategy: round-robin
      commands:
        - proxy-groups.⚖️ 负载均衡-散列.proxies=[]proxyNames
        - proxy-groups.0.proxies.0+⚖️ 负载均衡-散列
        - proxy-groups.⚖️ 负载均衡-轮询.proxies=[]proxyNames
        - proxy-groups.0.proxies.0+⚖️ 负载均衡-轮询

手动添加负载均衡

#添加到第一个代理策略组
      - ⚖️ 负载均衡-轮询
      - ⚖️ 负载均衡-散列

#添加代理策略组
  - name: ⚖️ 负载均衡-散列
    type: load-balance
    url: http://www.google.com/generate_204
    interval: 300
    strategy: consistent-hashing
    proxies:
      - P1
      - P2
      - P3
  - name: ⚖️ 负载均衡-轮询
    type: load-balance
    url: http://www.google.com/generate_204
    interval: 300
    strategy: round-robin
    proxies:
      - P1
      - P2
      - P3

本地订阅转换

https://bulianglin.com/archives/51.html

搬瓦工VPS推荐购买地址:(bandwagonhost)Connect to the fastest VPS in China.

https://bandwagonhost.com/aff.php?aff=66954